

10 Things Nobody Told Me About 3D Printing
3D printing is not always easy, but it can be fun if you manage your expectations.
As an artist with an aerospace engineering and programming background, I was fairly confident that my foray into 3D printing would be absent any major surprises. I even had some experience with 3D design, so I certainly didn’t consider myself a total neophyte in the space.
And yet, over the last two years of building a business that prints 3D models of cities and other landscapes, I learned some valuable lessons that I (perhaps naively) had not anticipated.
I hope the following 10 nuggets will help other aspiring 3D printing artists navigate this fascinating and intricate landscape, while avoiding some of its pitfalls.
1. Affordable printers are not turnkey solutions
You can either buy a $10,000+ printer, or you can buy a cheaper printer, which will force you to learn a lot about the physics of melting plastic and the intricacies of robotic hardware. There is no middle ground. Because, at the end of the day, your 3D printer is just a device for precisely and repeatedly pushing melted plastic through a very tiny hole, and is subject to the vagaries of physics, the environment, and very likely tiny, invisible demons. A sub-$1,000 printer will force you to become an expert.
2. Don’t be afraid to DIY
If you have the time to assemble a 3D printer from a kit, you should embrace the challenge.
The process takes anywhere from ten to twenty hours, and you will make mistakes (oh, so many mistakes). But the experience will give you loads of insight into solutions to the inevitable problems you will encounter as you embark on your 3D printing journey. You’ll gain confidence and familiarity with the many moving parts, tolerances, and design of your new machine, which will prepare you to solve future challenges.
3. Expect Murphy’s Law
Now you’ve got a printer. Do you see those 500 parts, all working together in a carefully-orchestrated dance? Given enough time, every single one of those parts is going to break or loosen or vibrate or otherwise ruin your print.

And it’s not just the machine parts that will cause prints to fail: a change in the airflow in your room, a change in the cleaning agent you use on your build plate, a glitchy power cable, even extra dust in the air--any of these external factors can wreak havoc on your print. In fact, some of these failures might happen in the first thirty seconds of the machine’s life.
And yes, I am speaking from experience. My very first 3D printer had an improperly aligned x-axis limit-switch, so my first auto-home action -- the very first thing you do with a printer -- caused an immediate, loud, and scary failure.
This was the first of many failures. But even after thousands of hours of printing, your beloved printer will find a way to surprise you almost every time it malfunctions. “There is no way that could have failed,” I used to say. Now I say “what is it this time?” I admire the machine’s ability to innovate new ways to fail.
4. Momentum is paramount
Despite what you just read above, if you encounter a “sweet spot” of reliability (e.g. nozzle seems to be working, first layers are nice, final print quality is good) then print like hell - milk that opportunity and run as many jobs as possible, 24/7.
When completing big jobs in the past, I’ve had printers run without any adjustments for over a thousand hours with only two 10-minute breaks a day. I kept the same cadence, didn’t move the printers, didn’t change filament types, wiped the build plates the same way between each print, and lubricated the rods once per week. It was beautiful.
5. Knowledge is power
Know your printer inside out. Become familiar with the sight, sounds, smell, and feel of a successful print job. My desk is in the same room as the printers, and now I get a “spidey sense” when something needs attention and can rectify or abort before things go seriously wrong.
6. Embrace the unknown
Don’t be afraid to remove parts to study them, especially the hot end. If you print enough, (see #2) you will eventually realize that you need to disassemble the hot end to fix a problem.

A burned PTFE tube - this should not happen, but it did
It’s scary and potentially time-consuming, so it’s easy to just move on to some other project (you’ve probably got a lot of them); but the time spent and experience gained from tinkering are worth it. You’ll learn a great deal about the printer and the process, enabling you to identify and solve future issues. Be confident - you can do it!
7. Embrace complexity
Because 3D printers are so versatile and there are so many filaments to choose from, people use them to print a wide variety of things.
Every 3D model is different, every filament has different properties, every setting in your slicer does something important, and there are complex interactions between the print and the filament and the slicer settings.
There’s no easy way around this, so embrace the complexity. If you’re fortunate enough to only print objects with similar physical characteristics and size from the same filament (material and supplier), you may only need a handful of settings. But most folks aren’t, so, like them, you’ll be performing lots of experiments to get the right settings.
8. Trust but verify
There is no shortage of knowledgeable experts and bloggers who offer valuable advice about 3D printing, slicing settings, and printer repair. And you should seek out all the wisdom that’s at your fingertips.
But note this caveat: much of the advice you’ll read won’t be appropriate for your printer or the types of objects you want to print. And, let’s be honest, for every solid piece of advice on the Internet, there’s information that’s just plain wrong. You’ll have to use your 21st century information-validation skills to sort through it all.
9. Learn by failing
If you’ve read this far, you probably think I’m a cynic. With so many things that can (and will) go wrong, how do you get anything done? Here’s where I implore you to think like a scientist. When something goes wrong, think of it not as a failure, but as an opportunity to learn something.

Insufficient bed adhesion caused this trio of spaghetti monsters
As Thomas Edison once said, “I have not failed. I've just found 10,000 ways that won't work.”
So, first assemble the evidence, think about possible solutions, and then test one thing at a time.
Every test should be preceded with a question that you can articulate on paper or out loud: “Is the set screw loosening after a few minutes of printing?” “Will lowering the z-offset prevent the edge of this print from pulling up?” “Will speeding up my top surface infill lower the shine on the top of my prints?”
Don’t expect questions like “how do I reduce stringing?” to generate results, focus more on actions than problems: “will increasing my retraction distance reduce stringing?” You can climb a mountain with little steps, but they have to be in the right direction.
10. If you’re not having fun, it’s not worth doing
Finally, and I wish more 3D printing experts emphasized this, 3D printing is fun fun fun!
It’s remarkable to see a machine build a 3D part right in front of you, and it feels amazing to have dialed-in your machine and slicer settings to be able to consistently produce high quality parts. The rewards come fast and furious as long as you don’t let the inevitable failures keep you down.
There you have it, 10 things that I wish someone had told me before I embarked on my adventure in 3D printing. I encourage you to try it out, be bold, and have fun!

A successful print: Montreal 12”/30cm
What is Scale?
Like most mathematical things, scale is a simple concept wrapped in a specific word with deep ramifications. As far as miniatures are concerned, scale is simply the ratio of lengths between two representations of a thing. If MiniCityArt made a print of a city block as big as the real city block, we’d call that 1:1 scale. Obviously, we’re not going to make a print that large! It’s a lot cheaper to build a 1:1 building out of concrete and steel than 3D printing filament, and a lot faster! Nevertheless, this begins our visual illustrations of scale and how it relates to 3D printing cities.
We would love to be able to print entire cities and make them affordable, but cities are big. Our perception of cities as being dominated by immense tall buildings ignores the fact that less than a few percent of the area of most cities contains those tall buildings. And the height of those buildings is minuscule in relation to the width of their host city. Let’s take Detroit, a city I’m very familiar with. Detroit is about 18 by 11 miles in size, noting that 11 miles is 58080 feet. A nice 12” (1 foot) print of the city would need to be 1:58080 scale to contain just the North-South extent of the city (1 foot on the model represents 58080 feet in real life). The tallest building in Detroit, the Renaissance Center, stands 727 feet tall. On our hypothetical model, that building would be only 0.15” tall (12 inches times 727 feet divided by 58080 scale ratio), or 3.8 mm. Would you even notice it?
So, instead of trying to print the entire city, MiniCityArt models focus on the downtown - where all the landmark buildings typically are! The first photograph below is a 6”x6” print of downtown Detroit at 1:20000 scale. There’s the RenCen on the right, adjacent to the river. You can see that there’s a little detail in the buildings, and smaller buildings and patches of trees are visible as clumps, but nothing smaller than that is apparent. And we’re covering nearly four square miles (6” is one-half foot, times 20000 is 10000 feet, which is about 2 miles) of Detroit’s nearly 140 square miles. A model of the whole city at this scale would measure about 5 by 3 feet.

Downtown Detroit at 1:20000 scale
Our 8” models are in 1:10000 scale, so one inch on the model represents 10000 inches in the real world (about 833 feet). The Renaissance Center (727 feet, remember) is a little less than that 833 feet, so we would expect the Renaissance Center in a 3D print of Detroit at 1:10000 scale to be a little less than one inch tall. Well, the image below shows one quarter of the area of the print above, and here at 1:10000 scale. So this is about one square mile, and now we can start to see air handling units on the roofs of buildings, more details in the buildings, some bridges, and even some individual trees and monuments and public artwork.

Downtown Detroit at 1:10000 scale
Let’s go even larger. Well - the print will stay the same 6”x6”, but the scale will change to 1:5000. This is the scale that we use for our 24”x24” 3D printed cities. Here’s where things get really interesting. Now we can see individual buses and even cars. Some light poles show up as thin sticks. Larger works of public art now have shapes, and even more architectural details are visible, including thin spires, walls, and fences.

Downtown Detroit at 1:5000 scale, centered on Hart Plaza
We’re not done yet! The data that MiniCityArt uses is called LiDAR, which stands for Light Detection And Ranging. Airplanes fly overhead and project a swath of small laser pulses down at the ground. If a pulse hits anything which causes the light to bounce or reflect back up to a detector on the airplane, a record is made of the direction and time that it took the pulse to return. With precise knowledge of where the airplane is and of the speed of light, the device calculates a position for where that reflection occurred. The collection of those positions is a “point cloud”, and only contains the position of the “hits”, not what was hit. It could have been a patch of pavement, a blade of grass, a foamy crest of a water wave, or a person’s hat. And there are millions of these “points” per square mile, sometimes tens of millions.
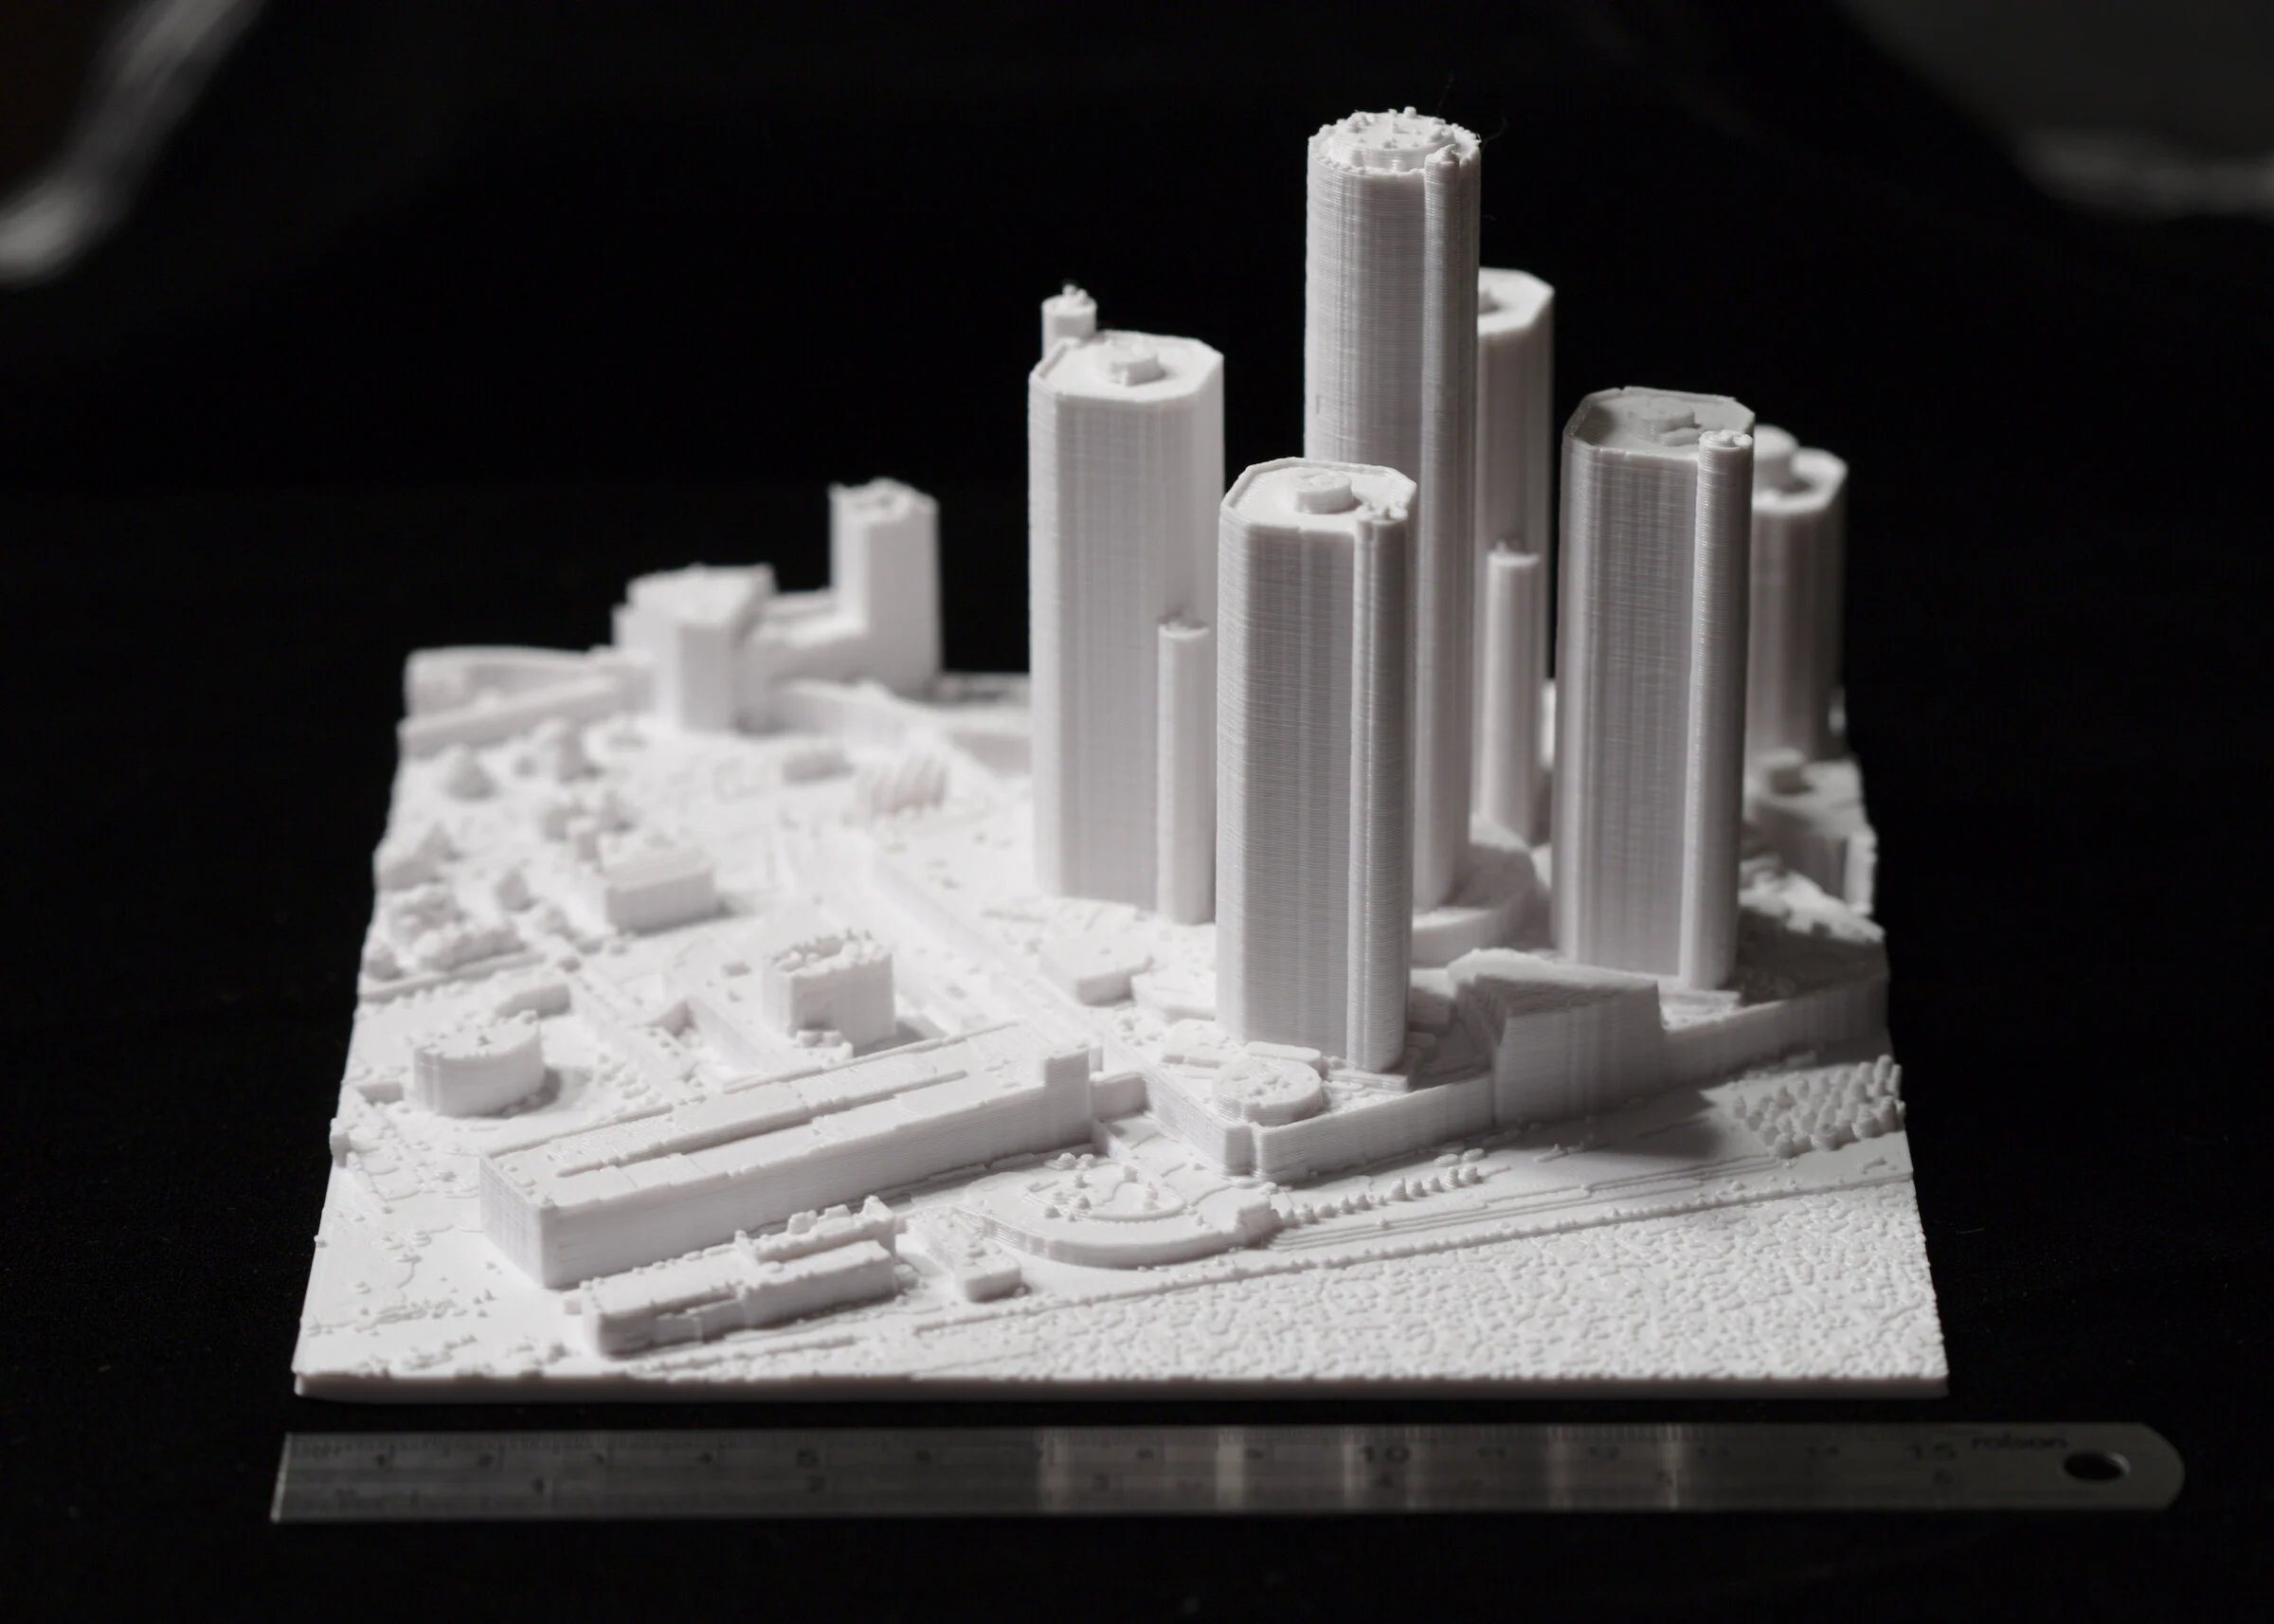
This abundance of data gives us the ability to 3D print cities with incredible levels of detail. The final image below is the Renaissance Center and surrounding buildings printed at 1:2500 scale. This is the scale that we print our largest models at: anything over four feet in size. At this scale, every car is present. Most light and electrical poles, all fences, all trees and most shrubs. Every bus, truck, and boat. Recliners on urban roof decks are even here. This is about the limit of our data. At this scale, we could print the entirety of Detroit, but the full model would measure 38 by 23 feet (18 by 11 miles times 5280 feet per mile divided by 2500), and would take 6 years to print on a single 3D printer.
That sounds like a challenge.

Renaissance Center and nearby parking garages at 1:2500 scale